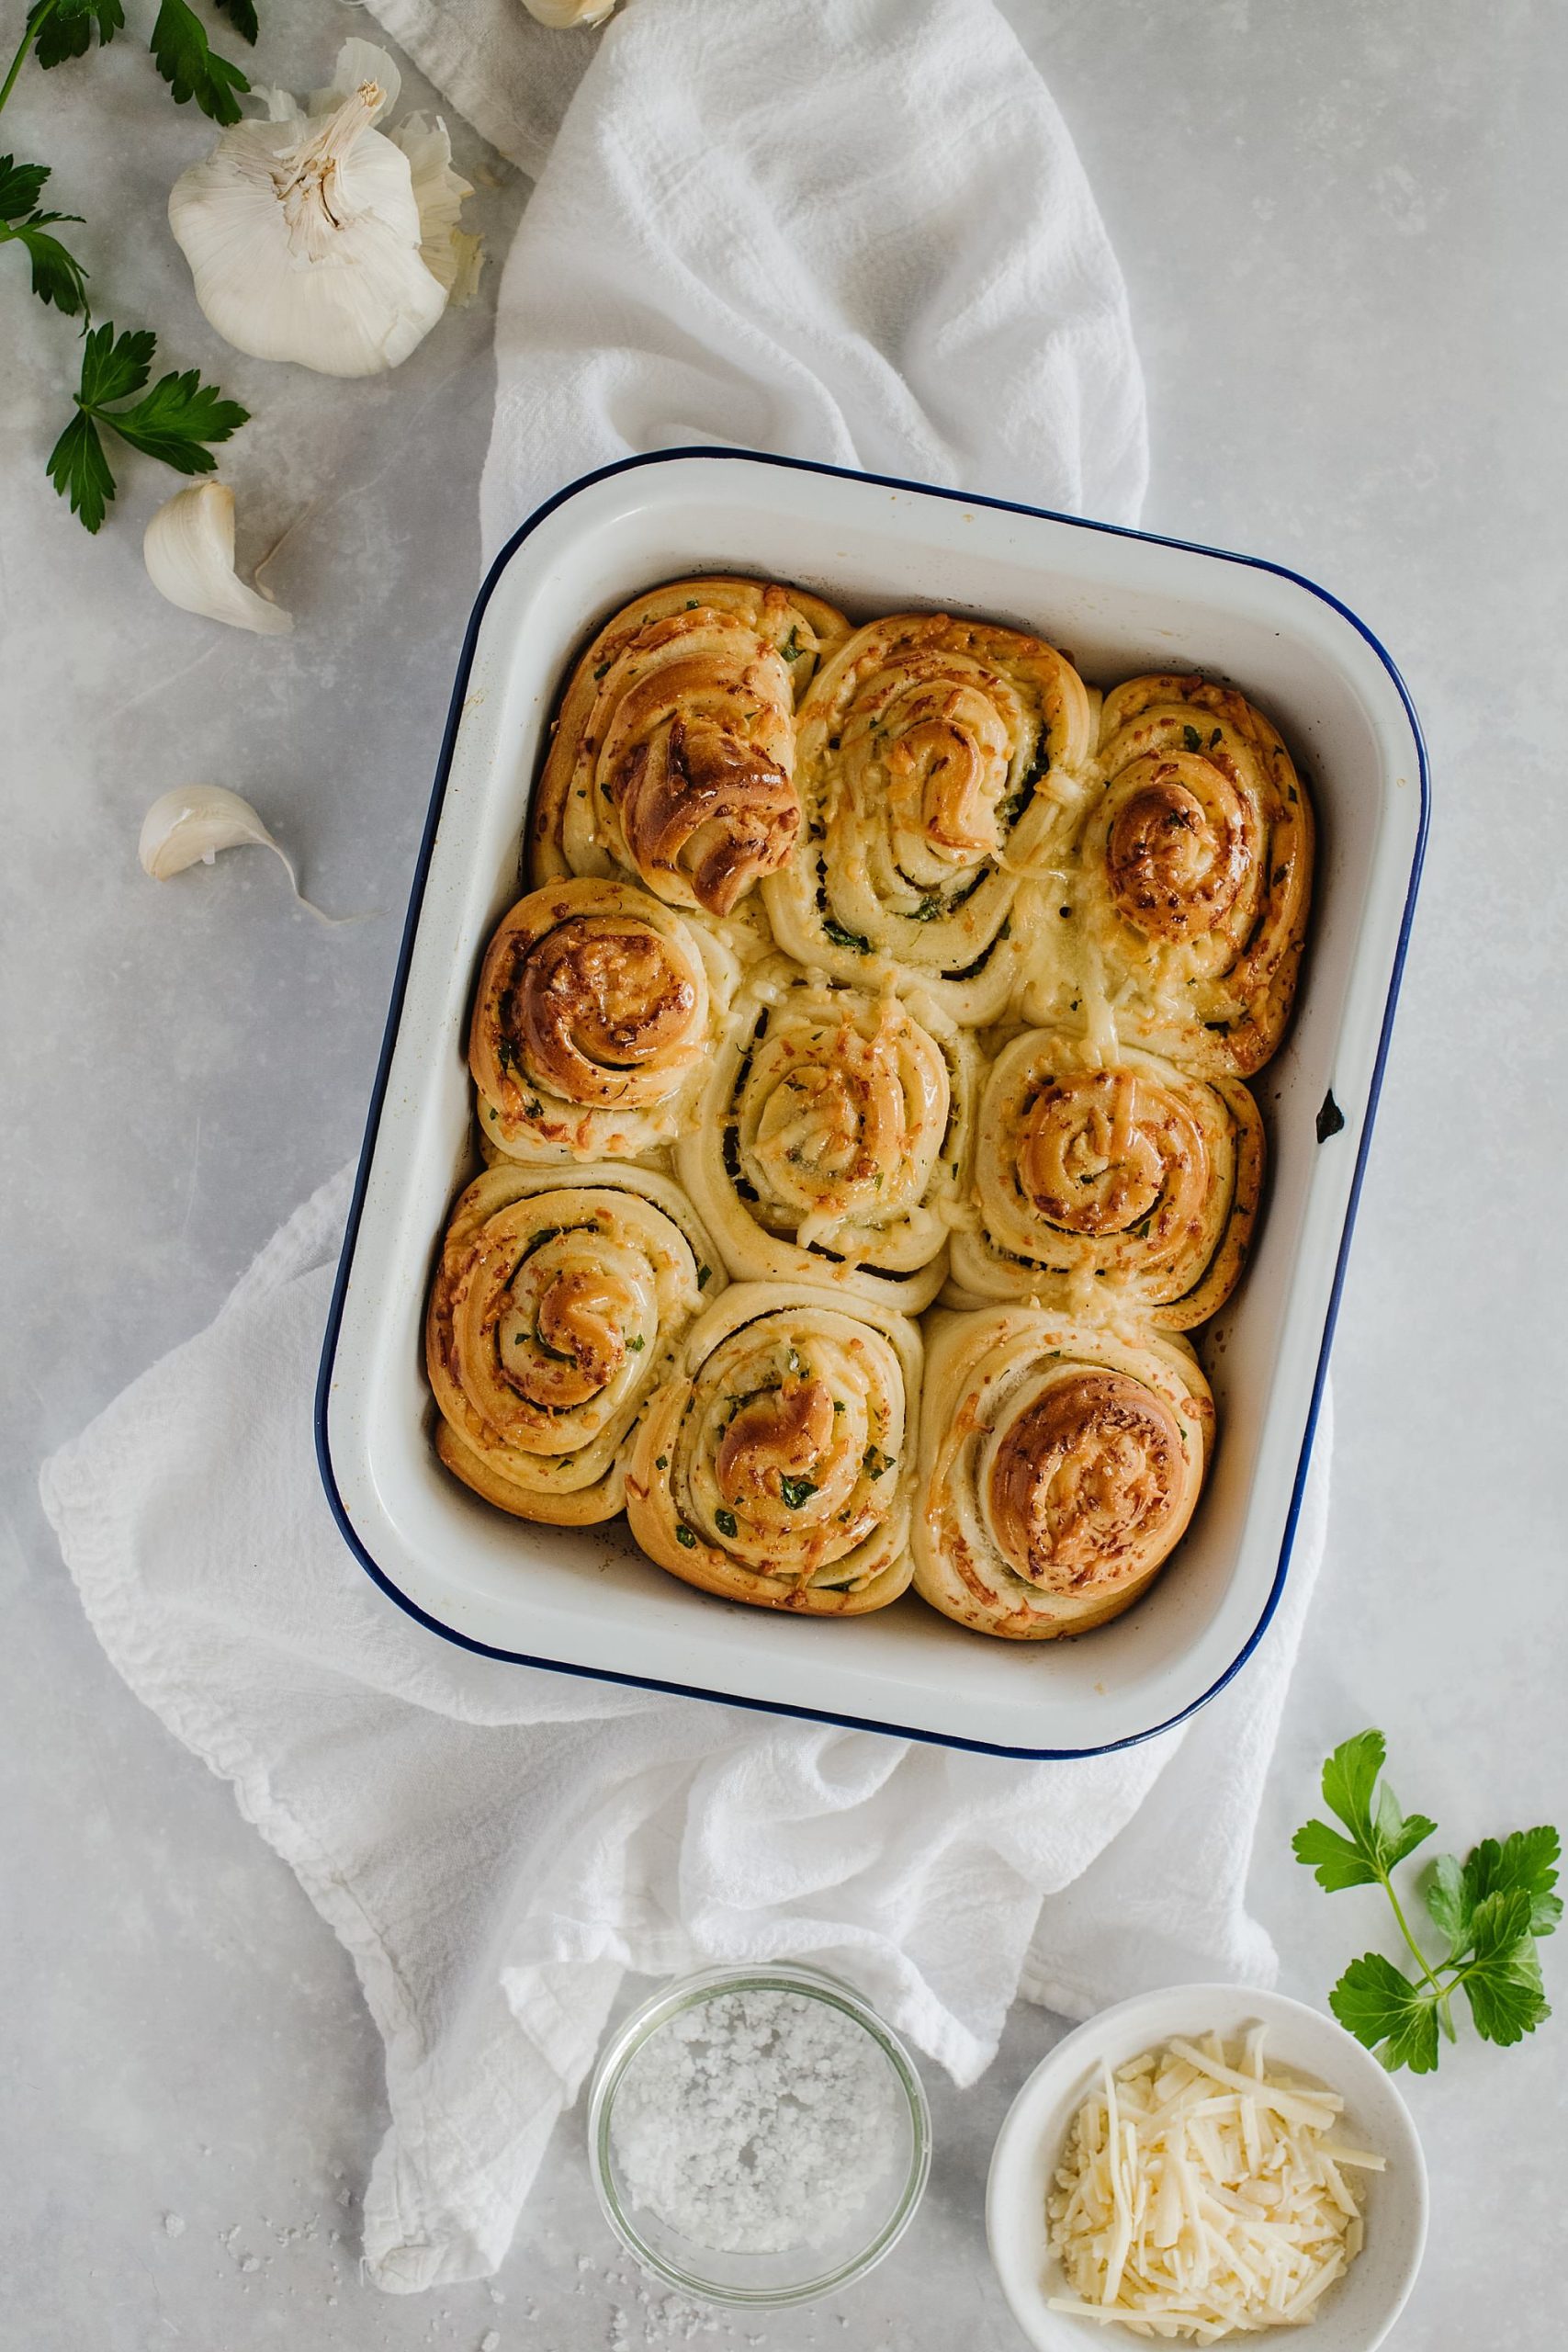
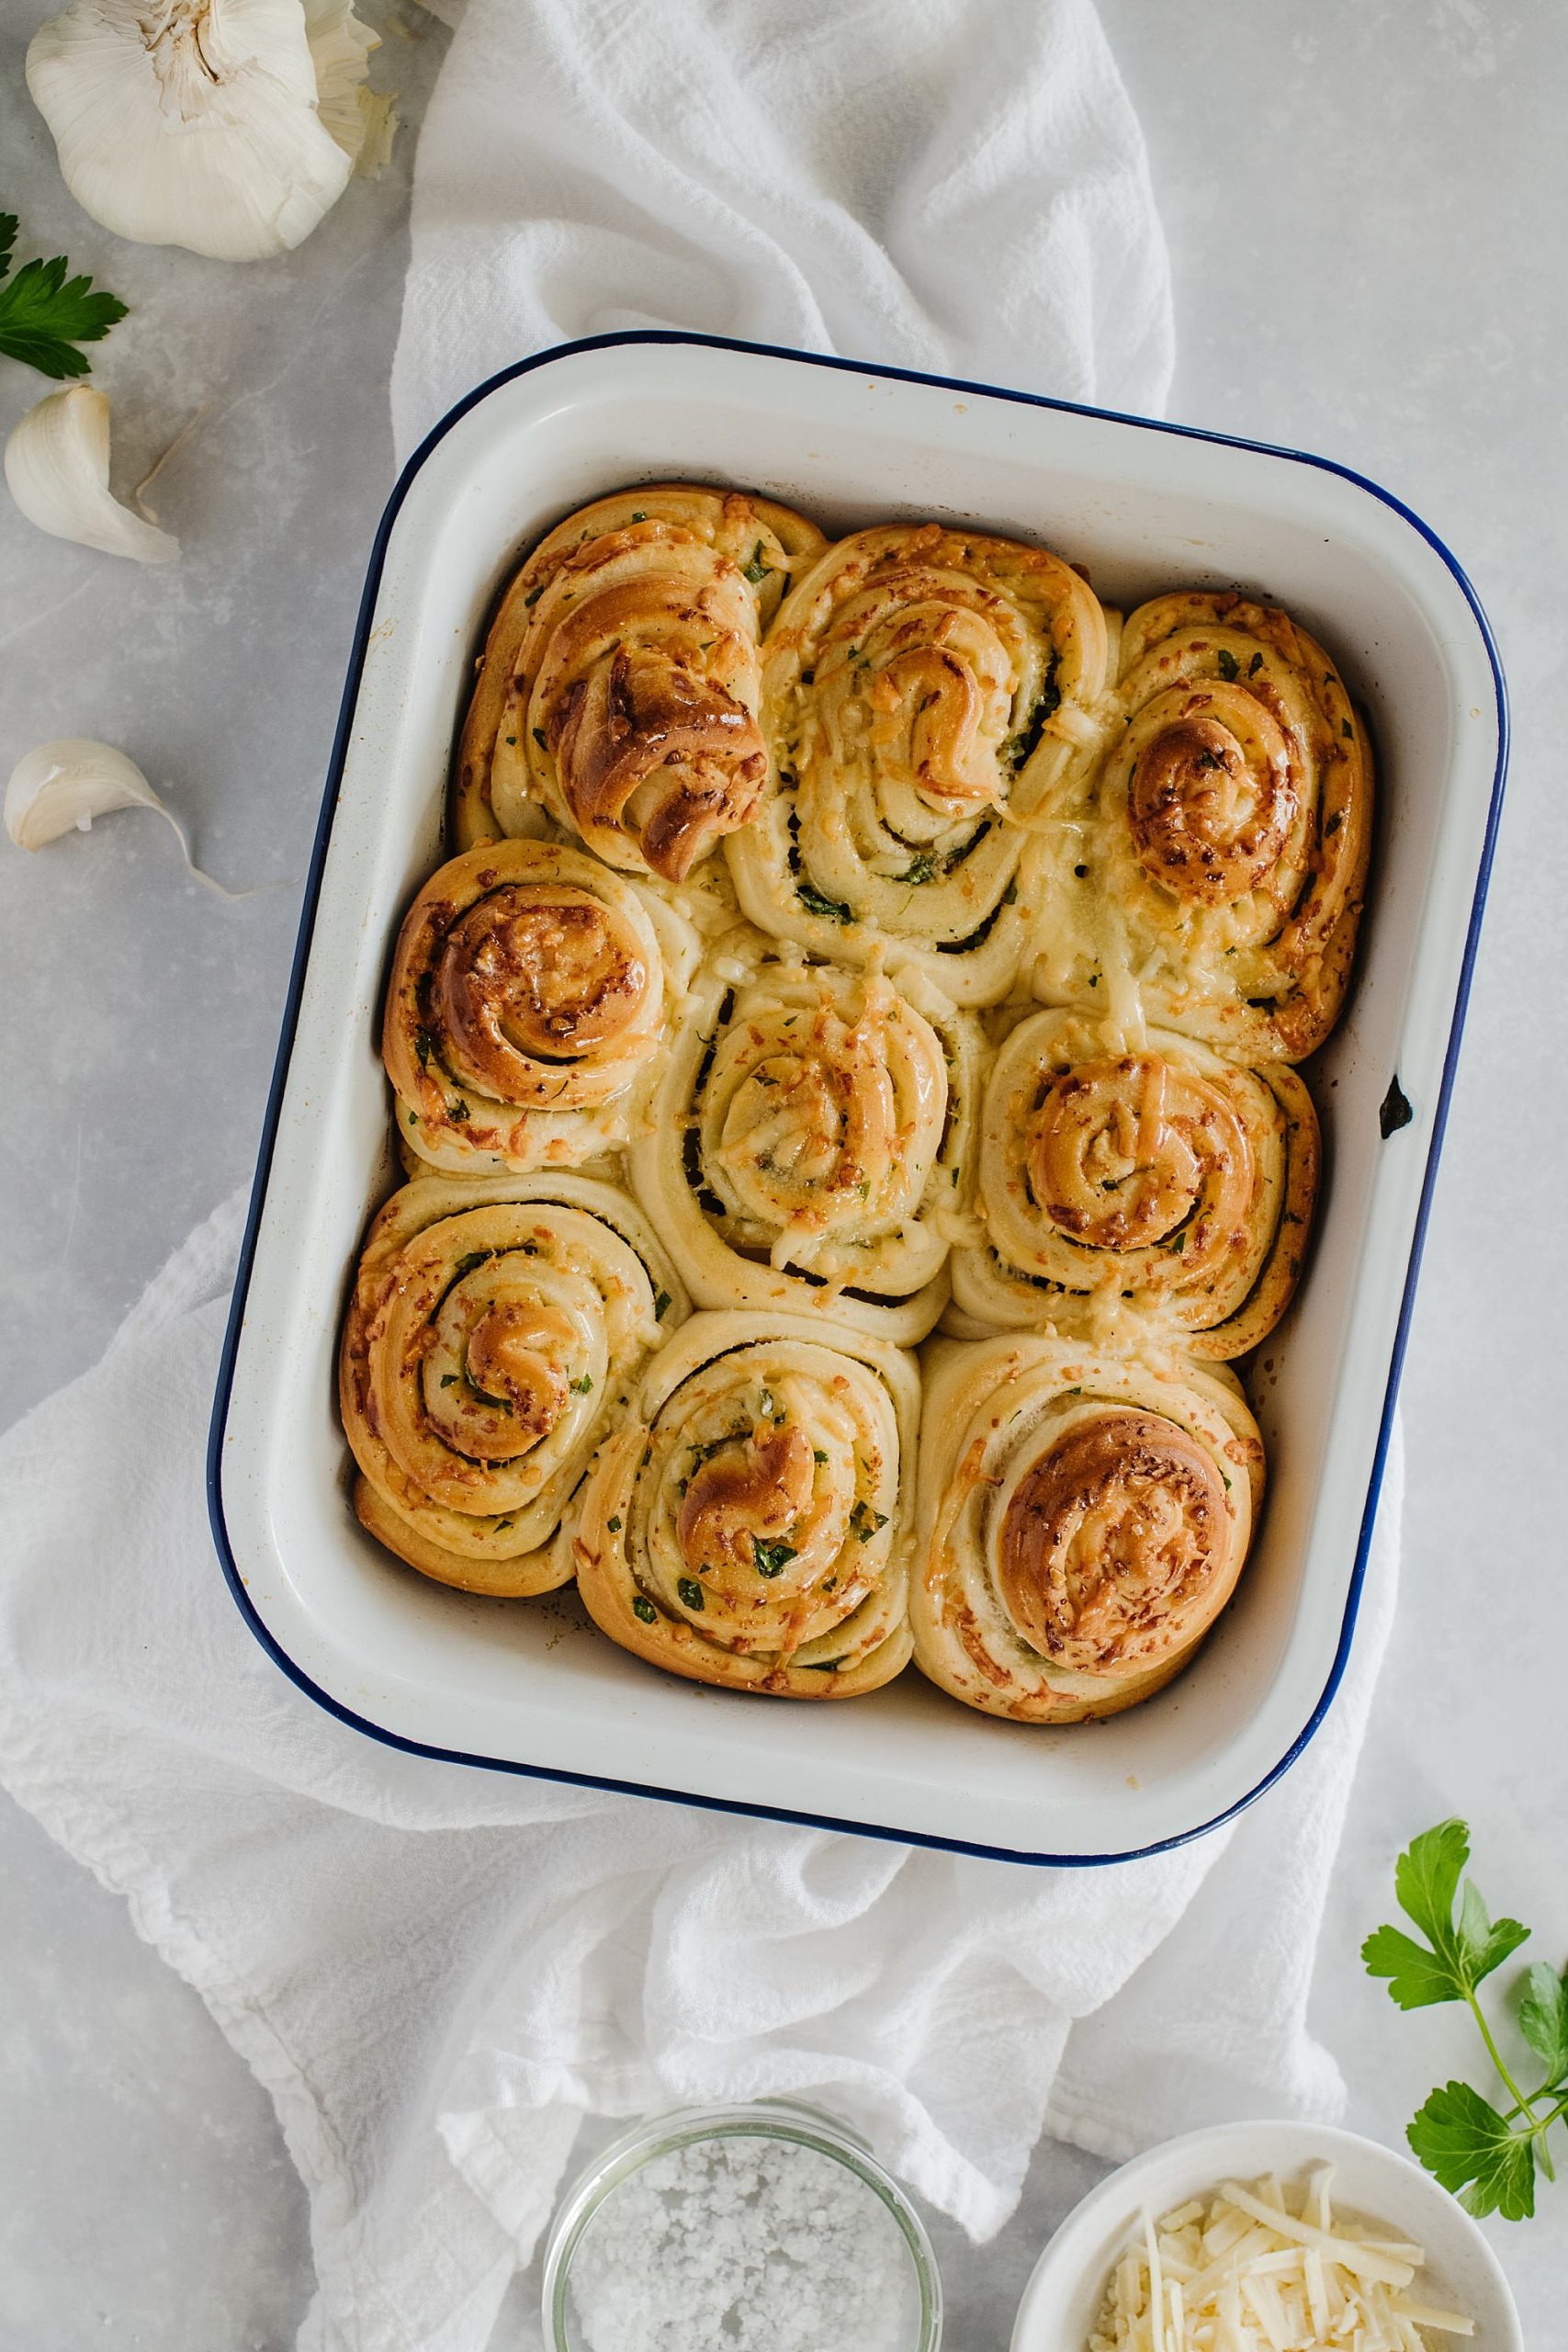
These Garlic Rolls are baked until crusty on the outside and soft on the inside that’s slathered with garlicky butter and flecked with parsley. It’s an easy pull-apart rolls recipe best served alongside soups and salads.

Do you ever get an idea that is so good that you cannot think of anything else? I posted a cinnamon roll recipe a while back and one of my brilliant readers gave me the idea to make a savory version of them. Seriously, why didn’t I think of that?
A hybrid between two of my absolute favorite treats. Cinnamon rolls and garlic bread. I thought that I might be on to something when I smelled the garlic smell wafting through my house as they were baking.
Garlic Rolls Ingredients
The two main components of this recipe are the dough and the garlic butter.
For the dough:
- 2 1/4 teaspoons active dry yeast
- 1/2 cup warm water
- 1/3 cup sugar
- 4 cups bread flour
- 6 Tablespoons melted butter
- 1 cup milk
- 2 teaspoons salt
- 1/4 cup grated Parmesan cheese
For the garlic butter:
- 8 Tablespoons room temperature butter
- 2 cloves finely minced garlic
- 1/3 cup chopped flat leaf parsley
- salt and pepper
Yeast. I use active dry yeast, which needs to be dissolved and activated in lukewarm liquid before mixing it into the dough. If you only have instant, rapid rise or fast action yeast, follow the directions in the recipe and reduce the first rise time by 10-15 minutes.
Warm Water. I specify warm water because the water needs to be warm enough to activate the yeast, but not too hot as to kill it. The ideal temperature is 100 – 110 degrees F. You may want to use a thermometer to be sure you have the right temperature.
Bread Flour. Bread flour has a higher protein content as compared to all-purpose flour. And more protein means more gluten formation and a chewier texture. This is exactly what we want for any bread recipe. That being said, if all-purpose flour is all you have on hand, these rolls will still turn out soft and delicious. They will lack a slight bit of chew.
How To Know If Your Yeast Is Activated//
Before we jump into the recipe steps, it’s important to know what to look for to make sure the yeast is activated and ready for rising.
- Use water at 100 – 110 degrees F. I warm my water on the stovetop for a few minutes or in the microwave. You can use an instant-read thermometer to make sure the temperature is just right, but if it is slightly warm to the touch, it’s good to go!
- Add 2 Tablespoons sugar to the yeast and water. The sugar is like food and will ensure the yeast activates properly.
- The yeast will activate after a few minutes. You should see the yeast start to become foamy.
- After 10 minutes, the yeast should be bubbling and foamy. This means the yeast is very active. If the yeast isn’t doing anything, discard the yeast and start again.
How to Make – The Steps
I had no idea that the rolls would be all soft and warm. And I had no idea that my husband and I would stand over the baking dish and inhale the smell of freshly baked bread and drool. I also did not know that these would be such a cinch to make.
The homemade bread dough takes some time, but your patience will be rewarded. While the rolls are rising, I prep the garlic butter to smear on top, then cut and roll. Simply:

Step 1: Activate the yeast. Mix together the yeast and water. Measure 1/3 cup of sugar and add 2 Tablespoons from the measured sugar to the bowl. Whisk these together until the yeast is dissolved. Let the yeast stand for about 2 to 3 minutes until it is foamy.
Step 2: Feed the yeast with some flour. Stir one cup of the flour into the yeast mixture. Set this aside.
Step 3: Add the remaining ingredients to an electric mixer. In the bowl of a stand mixer or in the food processor, add 2 cups of flour, the rest of the sugar, melted butter, milk, and salt.
Step 4: Add yeast mix and more flour, if needed. Process until the dough comes together. Add the rest of the yeast mixture. Add 1/4 cup of flour until the dough comes away from the sides of the bowl. You may have some flour left over.
Step 5: First rise. Put the dough in a bowl coated with cooking spray. Cover the bowl with plastic wrap and let the dough rise and double for about 2 hours.
Step 6: Prep the garlic butter. While the dough is rising, make the garlic butter. Mix together the butter, garlic, and parsley, and season with salt and pepper.
Step 7: Roll out and slather. Roll the dough out into a rectangle about 16 inches by 10 inches. Mine is not very pretty, you will take your time, won’t you? Slather the dough with garlic butter.
Step 8: Cut. I used a pizza cutter to cut the dough into strips.
Step 9: Shape. Roll the strips up and put them in the pan on their sides.
Step 10: Second rise. Cover the pan with a towel and let rise for about 45 minutes.
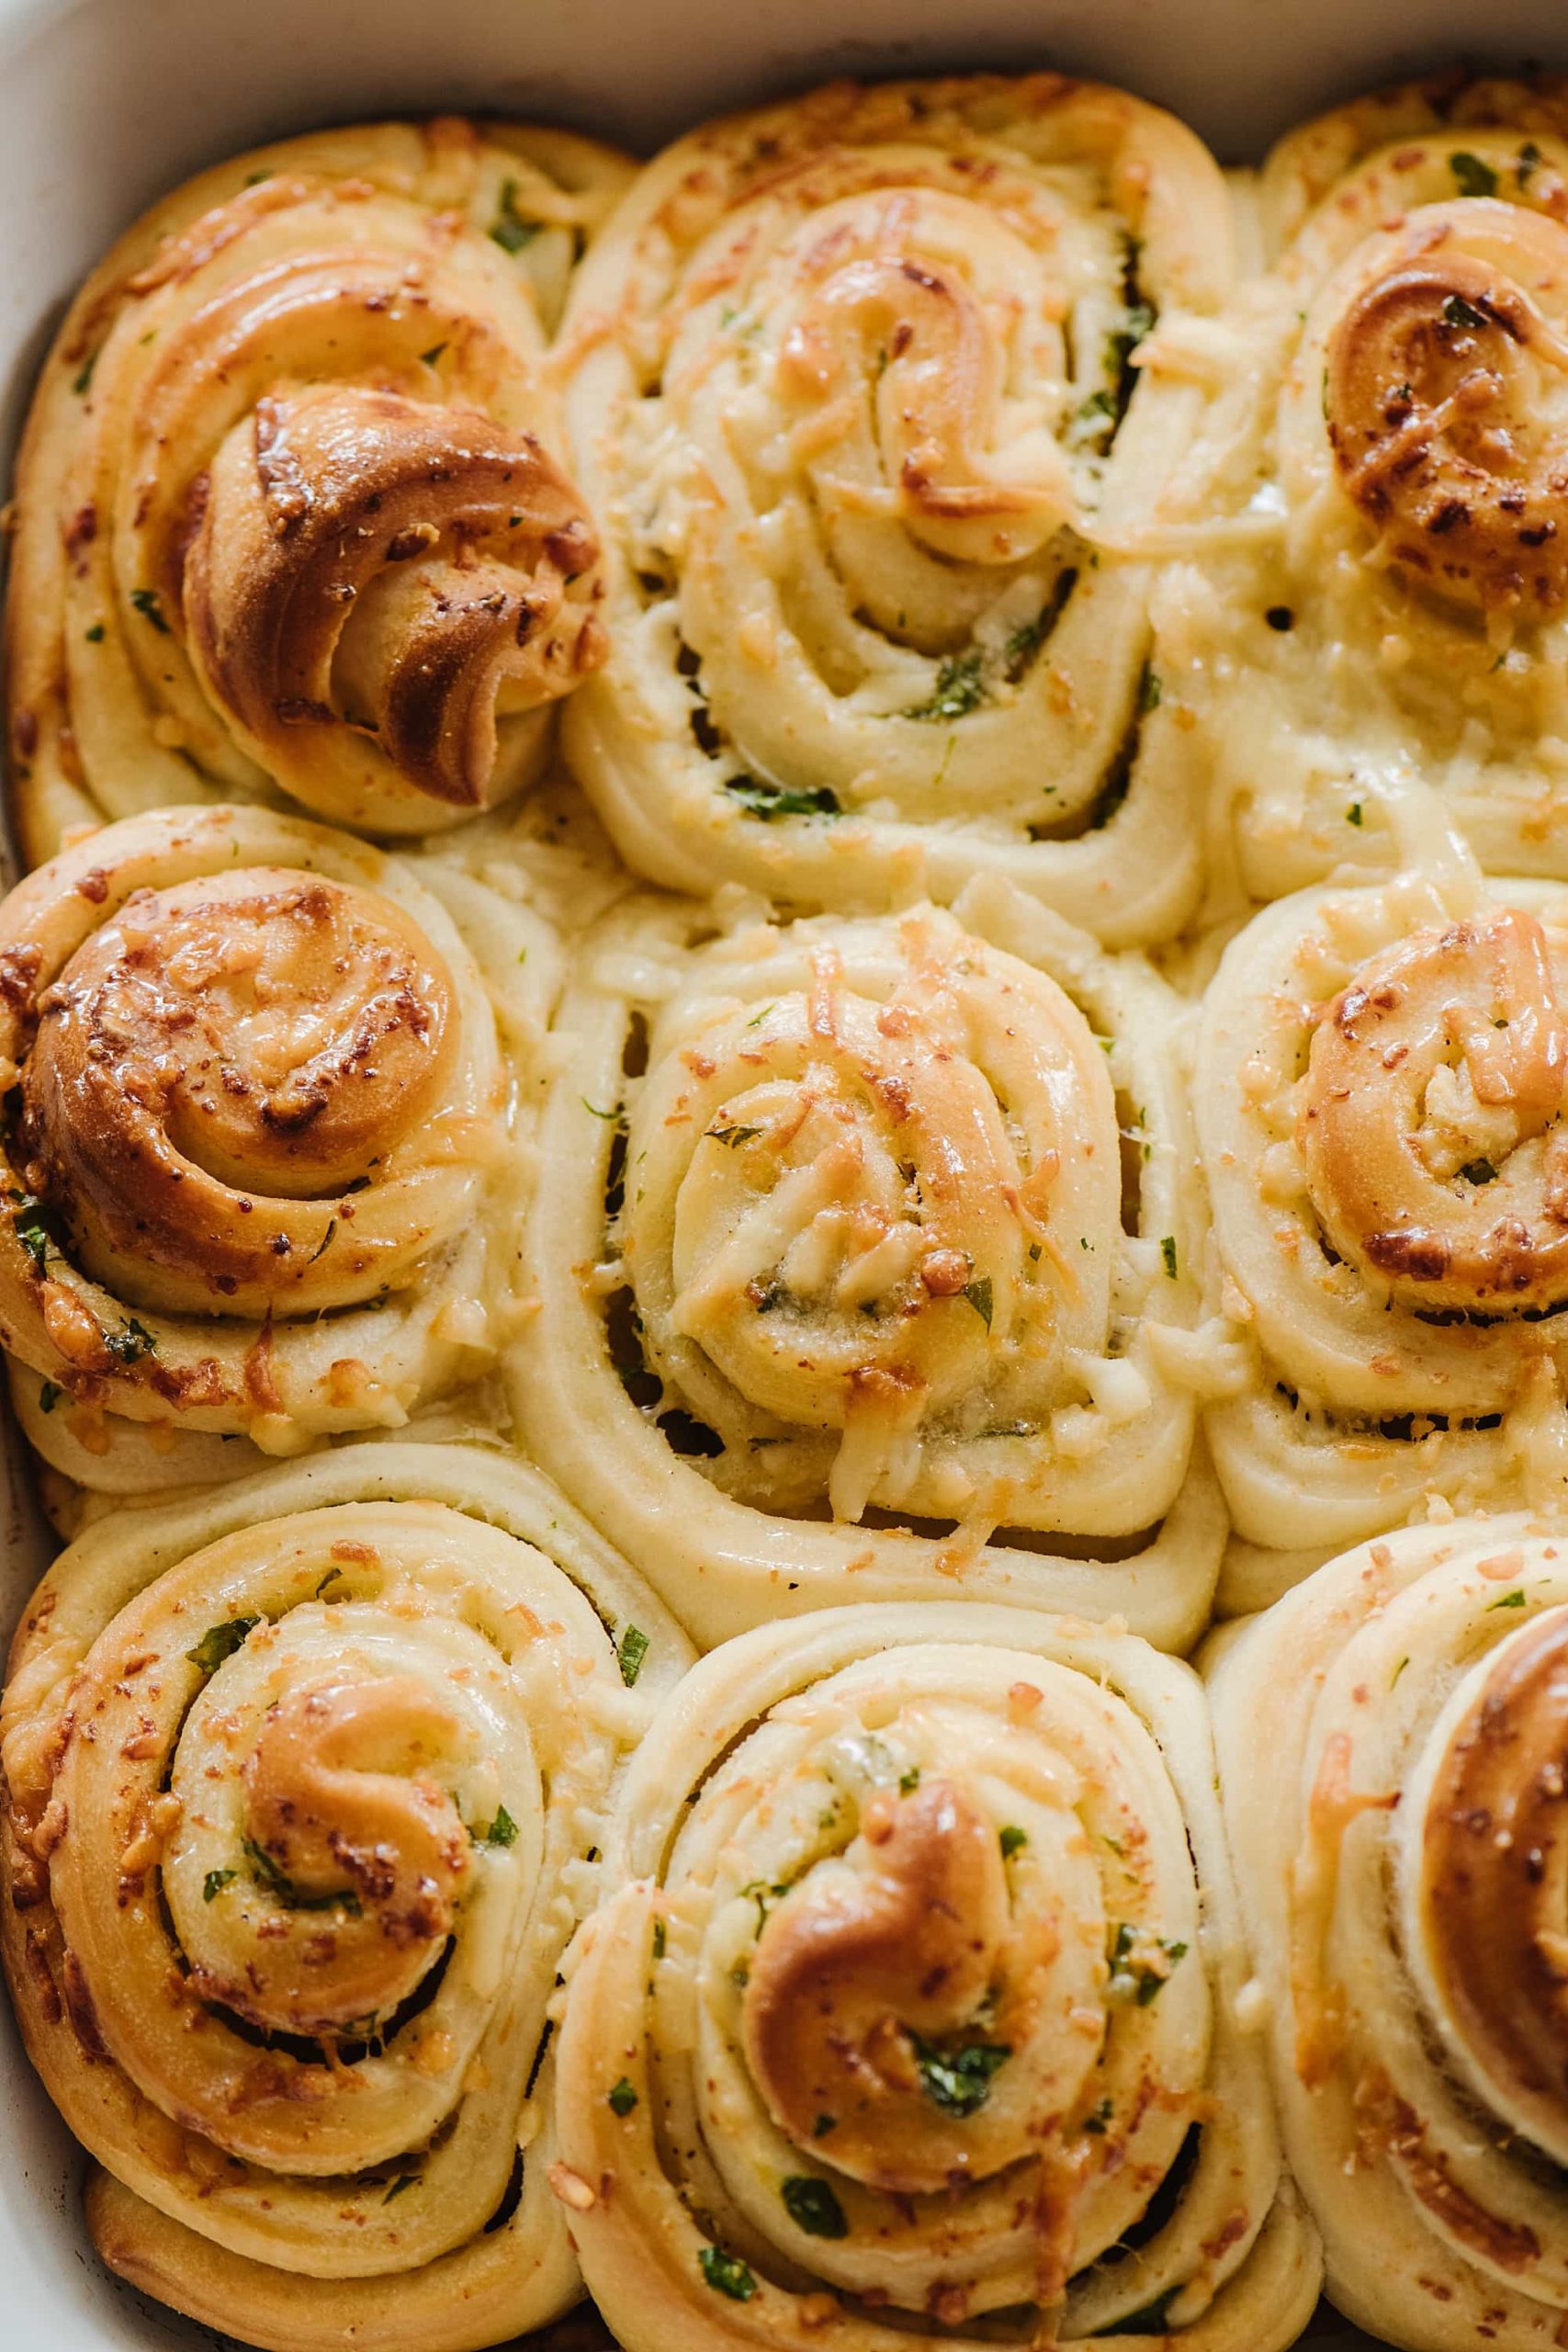
Step 11: Sprinkle the Parmesan. Once risen, sprinkle with grated Parmesan cheese.
Step 12: Bake! Bake the garlic rolls in a preheated 375-degree oven for 15 to 20 minutes, or until golden brown.
What Makes These Garlic Rolls So Good?
Is there anything better than a soft and buttery homemade roll. I love these garlic rolls so much because:
- The enriched dough creates a soft, tender, drool-worthy texture and flavor.
- Pull-apart rolls are just as fun to make as they are to eat.
- Garlic butter. Need I say more?
Top Tips for Homemade Garlic Rolls
- Use lukewarm water. The ideal temperature for yeast to activate is 100 – 110 degrees F. An instant-read thermometer is the most accurate way, but as long as the water is slightly warm to the touch, it’s good to go.
- Seek out the bread flour. Bread flour has a higher protein content when compared to all-purpose flour. It makes the world of difference in this recipe.
- You may not need all of the flour. This is because of different levels of moisture in the air and your particular brand of flour. Follow the recipe as written and add the final cup of flour in ¼ cup increments. Stop adding flour as soon as the dough pulls away from the side of the bowl.
- Make sure the butter and milk are at room temperature. For best results, cool the butter once melted and allow the milk to come to room temperature before mixing.
- Let rise until doubled in size. This may take up to 2 hours if your kitchen is semi-cool. If you want the dough to rise faster, set the oven to 200 degrees, turn it off and then place the dough in the oven and let it rise until doubled in size. This speeds up the rising process and cuts the time in half.
- Make sure to group the rolls together in a small pan. This facilitates that pull-apart bake and texture.
Serving Suggestions
As soon as these garlic rolls come out of the oven, I just can’t wait to pop one in my mouth. I like to make these as an afternoon snack for my kids, but they are a full-flavored side to just about anything.
I serve these with chicken soup, lemony minestrone soup, tomato and basil soup, even lasagna soup.
They also make a great accompaniment to arugula caprese salad, chopped salad with spiced chickpeas, kale and sweet potato salad and grilled chicken caesar salad.
If there is someone in your life that you love, make these for them. They will love you forever.
Baked Garlic Rolls
Ingredients
For the dough:
- 2 1/4 teaspoons active dry yeast
- 1/2 cup warm water
- 1/3 cup sugar
- 4 cups bread flour
- 6 Tablespoons melted butter
- 1 cup milk
- 2 teaspoons salt
- 1/4 cup grated Parmesan cheese
For the garlic butter:
- 8 Tablespoons room temperature butter
- 2 cloves finely minced garlic
- 1/3 cup chopped flat leaf parsley
- salt and pepper
Instructions
- Activate the yeast. Mix together the yeast and water. Measure 1/3 cup of sugar and add 2 Tablespoons from the measured sugar to the bowl. Whisk these together until the yeast is dissolved. Let the yeast stand for about 2 to 3 minutes until it is foamy.
- Feed the yeast with some flour. Stir one cup of the flour into the yeast mixture. Set this aside.
- Add the remaining ingredients to an electric mixer. In the bowl of a stand mixer or in the food processor, add 2 cups of flour, the rest of the sugar, melted butter, milk, and salt.
- Add yeast mix and more flour, if needed. Process until the dough comes together. Add the rest of the yeast mixture. Add 1/4 cup of flour until the dough comes away from the sides of the bowl. You may have some flour left over.
- First rise. Put the dough in a bowl coated with cooking spray. Cover the bowl with plastic wrap and let the dough rise and double for about 2 hours.
- Prep the garlic butter. While the dough is rising, make the garlic butter. Mix together the butter, garlic, and parsley, and season with salt and pepper.
- Roll out and slather. Roll the dough out into a rectangle about 16 inches by 10 inches. Mine is not very pretty, you will take your time, won't you? Slather the dough with garlic butter.
- Cut. I used a pizza cutter to cut the dough into strips.
- Shape. Roll the strips up and put them in the pan on their sides.
- Second rise. Cover the pan with a towel and let rise for about 45 minutes.
- Spinkle the Parmesan. Once risen, sprinkle with grated Parmesan cheese.
- Bake! Bake the garlic rolls in a preheated 375-degree oven for 15 to 20 minutes, or until golden brown.

@Bree Hester, I also was wondering when you add the yeast mixture to the batter.
It doesn’t tell you when. I was reading the recipe over and over to try to figure it out and finally I just added it into the batter of milk and butter.
Did you rewrite it into another post?
Hi there! You’ll want to add the yeast mixture to the batter right after you’ve activated it, which is after step 3 in the “How to Make // The Steps” section. So, after mixing 2 cups of flour, the rest of the sugar, melted butter, milk, and salt in a stand mixer or food processor, you’ll add the activated yeast mixture followed by adding the additional flour as needed. Hope this clarifies it for you and happy baking!