Made with marshmallows, cream and chocolate chips, this Homemade Chocolate Fudge is rich, creamy and irresistibly sweet -a quick and easy treat to share with your friends and family this holiday season!
I don’t usually eat chocolate fudge, but a good friend of mine, Jen, made me a batch of the fudge she makes every Christmas, and I immediately got to work recreating her fantastic recipe for the blog.
This fudge is creamy, rich and chocolatey -everything I’ve ever wanted from chocolate fudge! If you’re looking for alternative fudge flavors, Chocolate Peanut Butter Stacks are another crowd-pleaser.
You’re going to love how easy it is to make chocolate fudge from scratch -no refrigerating, freezing or baking required! All of the melt-in-your-mouth fudge magic happens right on your countertop! Not to mention, if you love gifting consumables, this chocolate fudge makes the perfect holiday gift. Pair it with our Christmas Bark for an even more special treat.
Chocolate Fudge Ingredients
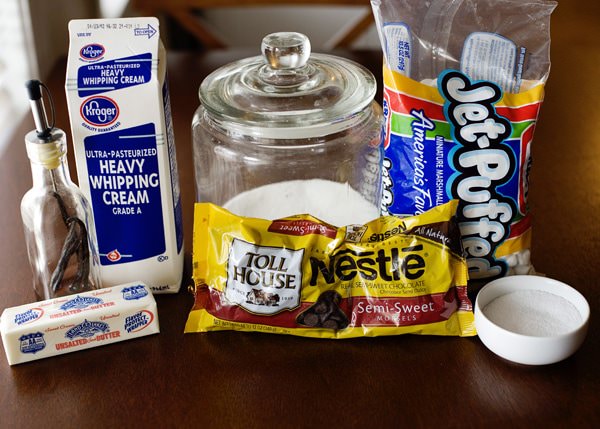
To make homemade chocolate fudge that is literally and figuratively “smooth like butter,” you’ll need 7 simple ingredients:
- Sugar: In fudge recipes, the sugar is the structure. It gets condensed into a syrup that then sets into a dense fudge.
- Salt: A little bit of salt enhances the sweet chocolate flavors. Without salt, most sweet treats would fall flat.
- Butter: makes rich, melt-in-your-mouth fudge.
- Cream: dampens the dry ingredients and gives the sugar something to dissolve in. It’s more stable than whole milk and holds up better to high heat.
- Mini-Marshmallows: contain gelatin and other stabilizing ingredients that help the fudge harden just enough to stay together but still be super soft and creamy. You also get all of the sugary-sweet marshmallow flavors.
- Semi-sweet Chocolate Chips: This wouldn’t be chocolate fudge without chocolate chips. Semi-sweet, bittersweet and dark chocolate chips are interchangeable (the taste and texture will be somewhat different).
- Vanilla: enhances the indulgent and delicious flavors of the whole recipe and highlights all of the rich chocolatey goodness.
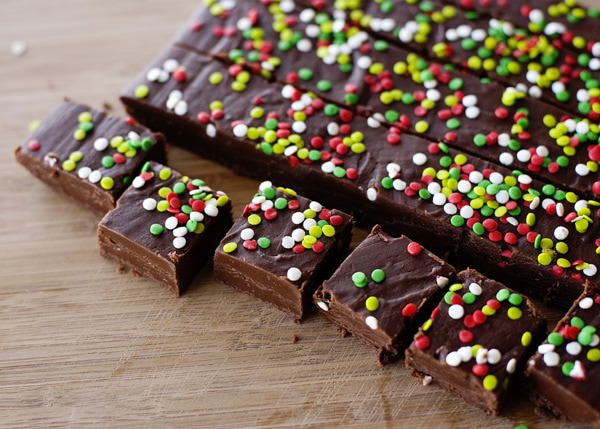
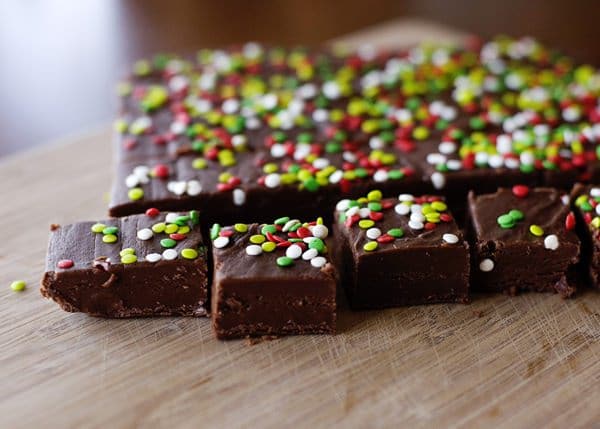
- Optional – Sprinkles and Crushed Candy Cane: Decorating the top of your fudge is entirely optional. I did half sprinkles and half crushed candy cane for some variety. Be sure to add your toppings before the fudge sets.
How to Make – The Steps
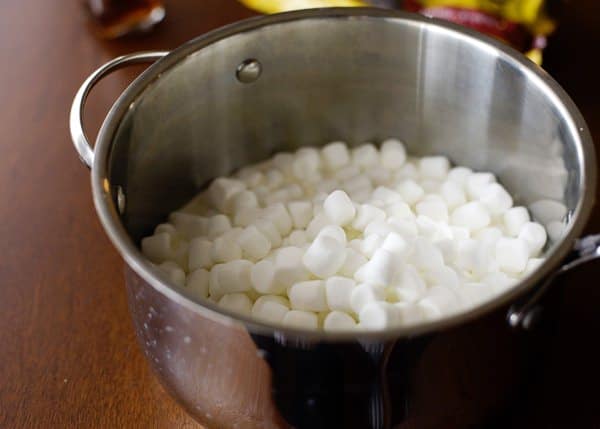
Step 1: Melt. In a large saucepan, add the sugar, salt, butter, cream and marshmallows. Cook over medium heat until the marshmallows and butter begin to melt (about 5 minutes).
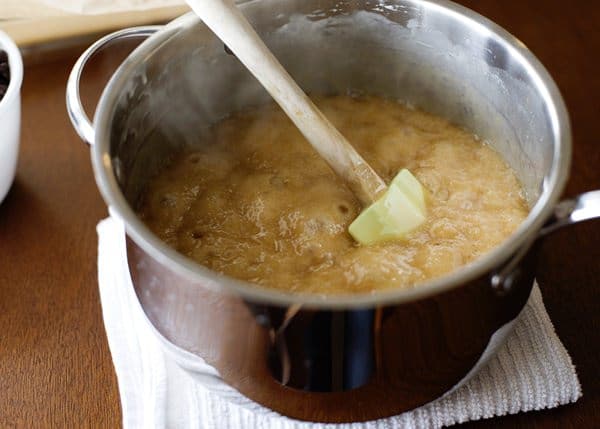
Step 2: Bring to a boil. Once the marshmallows have melted, raise the heat and bring the mixture to a boil. Boil for 5 minutes without stirring. The mixture will begin to brown and bubble. As soon as that happens, remove the saucepan from the heat.
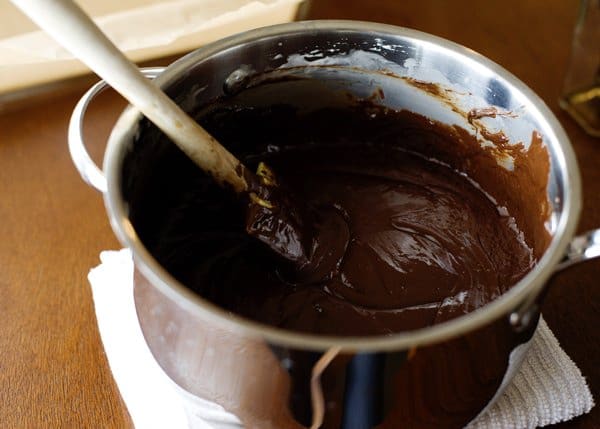
Step 3: Add chocolate and vanilla. Mix in the chocolate chips and vanilla until the chocolate has melted and the fudge mixture is smooth.
Step 4: Prepare the pan.Line a 9″x13″ pan with parchment paper and spray with cooking spray. Pour the mixture into the pan.
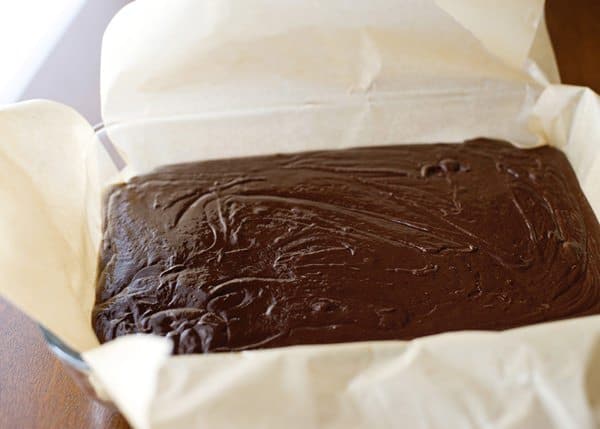
Step 5: Decorate and let set. If adding toppings, be sure to do it ASAP, before the fudge begins to harden. I sprinkle sprinkles on just about everything, so I put festive sprinkles on one side and crushed candy cane on the other. After decorating, let the fudge sit at room temperature for 3 hours before slicing.

Step 6: Slice and store.
Once the fudge is firm and set in the pan, cut into squares. I got about 48 squares from a 9″x13″ pan. Store in an airtight container at room temperature for up to 10 days.
Tips & Tricks for Making The Most Amazing Chocolate Fudge
- Use real cream. Milk will curdle over high heat, and we do not want that.
- Use quality vanilla and real butter. Do not use margarine or vegetable oil.
- When the fudge mixture starts to boil, it’s going to bubble up a lot. Use a large, heavy saucepan with tall sides to contain any splatter.
- Once the fudge mixture starts to boil, do not stir or scrape the saucepan. Leave it be until it starts to brown, and then remove the saucepan from the heat.
- Don’t forget to line your pan! Once the fudge is ready, you’ll be able to pop it right out of the pan. You can also foil or a silicone baking mat.
Why is Chocolate Fudge So Good?
- If you’re new to homemade candy, this simple recipe will walk you through how to make the perfect fudge every time. For those who love trying different fudge recipes, you might enjoy our Snowflake Fudge or Cherry Rocky Road Fudge.
- The options for customizations are limitless! Different flavors, mix-ins, toppings, etc.
- Great for gifting! Our Salted Caramels or English Toffee also make fantastic gifts.
- You can make it in advance and freeze (anything to save yourself some of the stress closer to the holiday!). Explore our Toffee Blondies for another make-ahead treat.
Toppings & Variations of Chocolate Fudge
A variety of goodies pair perfectly with this basic chocolate fudge recipe. The options are endless. You can add a layer of sprinkles, chopped candy cane, or try one of these tasty toppings:
- M & M’s
- Pretzel Pieces
- Chopped Nuts
- Crushed Oreos
- Reese’s Pieces
Peanut Butter Chocolate Fudge
Add 2 to 3 tablespoons of smooth peanut butter to the fudge mixture with the chocolate chips and vanilla.
Dark Chocolate Peppermint Fudge
Use bittersweet or dark chocolate chips and add 1/2 teaspoon of peppermint extract. A white chocolate and peppermint version might be up next.
Rocky Road Fudge
Fold in mini-marshmallows and chopped almonds or walnuts after mixing in the chocolate and vanilla.
How to Store The Most Amazing Chocolate Fudge
Storing: Your fudge will stay the softest stored on the countertop, but you can also store it in the fridge. Either way, you should store it in an airtight bag or container. Fudge can be kept at room temperature for 2 weeks or refrigerated for up to a month.
Make-Ahead and Freezer Options
Freezing: After your fudge has fully set, cut into slices and wrap individual pieces in a couple of layers of plastic wrap and freeze them in a freezer-safe bag or airtight container for up to 3 months—Thaw in the fridge overnight.
FAQ //
You can use a 13″x9″, 9″x9″ or even a bread pan. The fudge may need longer to set.
It shouldn’t be sticky and lumpy. It should be smooth and creamy throughout.
This may have happened because you over stirred and the sugar became grainy. To prevent this, do not stir the fudge as it’s cooling. As soon as it starts to boil and bubble, leave it be.
More Chocolate Recipes
Mexican Chocolate Cake with Mascarpone Frosting
Chocolate Fudge
Ingredients
- 2 cups sugar
- 1 teaspoon salt
- 6 Tablespoons butter
- 1 cup cream
- 3 1/2 cups mini marshmallows
- 3 cups semisweet chocolate chips
- 1 teaspoon vanilla
- sprinkles optional
- crushed peppermint optional
Instructions
- Add the sugar, salt, butter, cream, and marshmallows to a large saucepan.
- Cook the mixture over medium heat until the marshmallows and butter begin to melt, about 5 minutes.
- Once the marshmallows have melted, bring the mixture to a boil, and boil for 5 minutes. It will begin to brown and will bubble all over the place. Take the pan off of the heat.
- Add the chocolate chips and vanilla.
- Mix it all together until the chocolate has melted and everything is nice and smooth.
- I add a sprinkle to just about anything, so I added some festive sprinkles to one side, and some crushed candy cane to the other. Let this sit at room temperature for 3 hours before you slice.
- Cut into squares, I got about 48 squares out of my 9×13 pan. This fudge will keep at room temperature for 10 days in an airtight container.